Deploying metalsmith builds
← Docs overviewDeploy to Netlify
When you link a site to a Git repository (from your Netlify dashboard), Netlify automatically sets up continuous deployment for that site by installing the Netlify Github app. Netlify provides extensive documentation on linking a repository. metalsmith.io uses this default Netlify deployment method.
In the Netlify dashboard for your site, under Site Settings > General > Build and Deploy > Continuous deployment, you can alter basic build settings. For a metalsmith build using defaults the build script should be node metalsmith.js (API) or node_modules/.bin/metalsmith (CLI with JSON config) and the publish directory should be set to build/.
Metalsmith build output can be further aligned by adding a netlify.toml configuration file. Netlify provides some features (eg. redirects) at the server-level which are more optimal than configuring these as metalsmith plugins (but of course less portable)
If you want more control over your Netlify deployment (for example, to only deploy after a successful test run on the same branch) you can integrate manual deploys using the Netlify CLI in CI pipelines. Here is a list of Github actions for Netlify.
Deploy to Github Pages
Github provides extensive documentation on how to set up Github Pages for your repository. The two easiest ways to set up Github pages in a repository's settings (at https://github.com/<user>/<repo>/settings/pages) are:
Deploy from the /docs folder in your root branch
In the repository of your choice, set the appropriate configuration under Settings > Pages
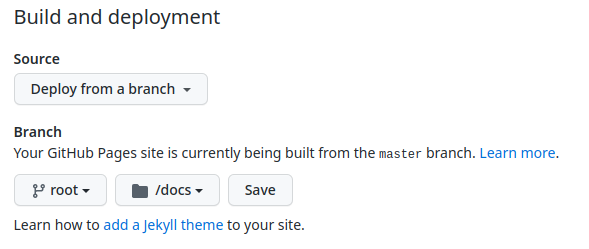
A typical Github repo with an src folder matching the default Metalsmith.source() directory could be set up simply with a docs destination.
Metalsmith(__dirname)
  .src('src')
  .destination('docs')
  .build((err, files) => {
    if (err) throw err
    console.log('Build success')
  })
After a build is run, commit the result to your branch and push it to Github: the Pages site will be automatically updated.
If you rather not "pollute" your main branch with build output, see the next section.
Deploy from the /gh-pages branch root
In the repository of your choice, set the appropriate configuration under Settings > Pages
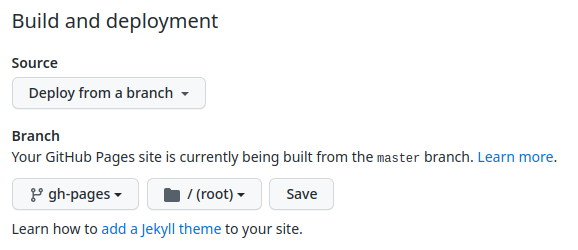
This method requires you to somehow get the metalsmith.destination() output to the root of another branch while avoiding future merge conflicts. Fortunately, git provides the ability to create orphan branches.
- First make sure that the path of your
metalsmith.destination()is in.gitignorein the main branch. - Run your metalsmith build
- Create a new orphan branch. This will automatically remove all git-tracked files, but keep your metalsmith build.
git switch --orphan gh-pages - Cut and paste the files in your metalsmith build to the root folder and remove the (now empty) build folder. For those of us using the bash command-line you could run
mv build/** . && rmdir build - Commit and push to your gh-pages branch
You could automate this procedure using the gh-pages NPM package or an alternative.
After npm install'ing gh-pages simply run
node_modules/.bin/gh-pages -d build
Or add it to a package.json script:
package.json{
"scripts": {
"deploy": "gh-pages -d build"
}
}
And run it with npm run deploy. For custom domains simply add a CNAME file in the root of metalsmith.source() with your root domain (eg. mydomain.com). The tips section of the gh-pages package has extra tips to further automate the deploy through Github Actions.
Deploy to Gitlab Pages
Gitlab provides extensive documentation on how to set up Gitlab Pages for your repository although it is centered on Jekyll. The principle is similar to deploying from the docs folder with Github Pages but uses Gitlab CI pipelines instead. In your repository, create a .gitlab-ci.yml file if not already present, and add the pages script.
Important: Gitlab Pages will only auto-publish if the build artifact is saved under the public path. That means your metalsmith.destination() should be set to 'public'
The example below demonstrates using a Gitlab CI pipeline that will run the test job on every push, and run the deploy job only for the main branch and if the test job succeeds first.
.gitlab-ci.ymlimage: node:16
cache:
paths:
- node_modules/
stages:
- test
- deploy
workflow:
rules:
- if: $CI_COMMIT_BRANCH
before_script:
npm install
test:
stage: test
script:
- npm test
pages:
stage: deploy
rules:
- if: $CI_COMMIT_BRANCH == "main"
script:
# choose one of the following
- NODE_ENV=production node metalsmith.js # metalsmith.js uses Metalsmith JS API
- NODE_ENV=production npm run build # same as previous, but in npm script
- NODE_ENV=production metalsmith # via Metalsmith CLI
artifacts:
paths:
- public
If you are running on a self-managed Gitlab installation, your Gitlab runner build server should have access to Docker hub in order to be able to execute the image keyword and download the appropriate Docker image. If your Gitlab runner build server has Node.js installed natively, you can run the pipeline without the image keyword.
Deploy to a shared host or a custom server
Deploy using an online file browser
Shared hosting providers provide an online file browser/ manager that uses HTTP to upload files. Note that this is the least optimal method of deployment and it is preferable tu use an SSH rsync deploy if possible, or an SFTP deploy. The document root will be a subdirectory called www or public or public_html. Click "Upload folder" or similar, then choose your metalsmith build folder. The file manager will add the folder to the document root by default. Move it out, delete all the contents of the document root, then enter your freshly uploaded build folder, select all of its contents and move them to the document root.
Deploy with rsync
rsync is a versatile file copying tool for Linux/ Mac. It can be used for cloning the output of your metalsmith.destination() build to a remote host via SSH. It has a lot of options but the basic requirements are always the same: you need a domain or IP address with an open SSH port and an SSH user that has write permissions to the target directory (= usually the document root of your website).
You can copy the bash script below (intended to be run from your computer or a build server) to your repository root and replace the variables with the appropriate values for your use case.
./msdeploy#!/bin/sh
# if you include this script in git versioning, remove the variables part and
# define them in the server environment instead, eg through the SSH_USER's .bashrc file
SSH_USER=root
REMOTE=mysiteorip.com
DOCUMENT_ROOT=/var/www/mysiteroot/
MS_DESTINATION=$PWD/build
if [ "$1" == "--dry-run" ]
then
rsync -avhn ${SSH_USER}@${REMOTE}:${DOCUMENT_ROOT} $MS_DESTINATION --delete
else
rsync -avh ${SSH_USER}@${REMOTE}:${DOCUMENT_ROOT} $MS_DESTINATION --delete
fi
Don't forget to chmod +x it so you can run it as ./msdeploy (or ./msdeploy --dry-run for testing).
If your user has a password, you will be prompted to enter the password.
To fully automate the process (and be able to run it from Gitlab pipelines or Github Actions, among others), set up SSH key authentication for the user.
If your web-serving user is different from the SSH user (which it ideally should), make sure it has read permissions for the document root.
Deploy with (S)FTP
If SSH is not an option, for example a shared host not providing an open SSH port, you can use SFTP to upload your metalsmith build to the web document root. The downside of using SFTP (especially through a user interface) is that synchronizing a directory takes multiple operattions. As a result your website may be unavailable for a few seconds, the time it takes to update the files.
There are 2 options to upload your metalsmith build via (S)FTP:
Download an (S)FTP software like Filezilla Client, set up a new site with the correct SFTP credentials and connect. Similar to 1. navigate to your metalsmith build directory in the local explorer, and drag and drop it to the remote explorer root. Remove all the files at the document root (usually
public,wwworpublic_html), then select all the files in your freshly uploaded build folder and move them to the document root.Use the command-line. LFTP is a useful utility to achieve similar results to rsync (doing a complete synchronization without potential downtime). It is available from the default software registries for Linux Debian (
apt install lftp), RHEL/CentOS (yum/dnf install lftp) and Arch Linux (pacman -S lftp).
You can copy the bash script below (intended to be run from your computer or a build server) to your repository root and replace the variables with the appropriate values for your use case.
./msdeploy#!/bin/sh
# if you include this script in git versioning, remove the variables part and define them locally,
# in CI pipelines or on a build server environment instead, eg through the SFTP_USER's .bashrc file
SFTP_SERVER=mysiteorip.com
SFTP_PORT=22
SFTP_USER=root
SFTP_PASS=xxxx
DOCUMENT_ROOT=/var/www/mysiteroot/
MS_DESTINATION=$PWD/build
if [ "$1" == "--dry-run" ]
then
lftp -d -c "set sftp:auto-confirm yes; open -d -p $SFTP_PORT -u \"$SFTP_USER,$SFTP_PASS\" $SFTP_SERVER; mirror --reverse --verbose --delete --dry-run $MS_DESTINATION/ $DOCUMENT_ROOT; quit"
else
lftp -d -c "set sftp:auto-confirm yes; open -d -p $SFTP_PORT -u \"$SFTP_USER,$SFTP_PASS\" $SFTP_SERVER; mirror --reverse --verbose --delete $MS_DESTINATION/ $DOCUMENT_ROOT; quit"
fi
Don't forget to chmod +x it so you can run it as ./msdeploy (or ./msdeploy --dry-run for testing).